7 Kitchen Cleaning Mistakes You’re Probably Making (and How to Clean Up Your Act!)
April 4, 2025
Jon Christensen
Tired of scrubbing with no results? Discover the top kitchen cleaning mistakes that could be holding you back and learn easy fixes to keep your kitchen spotless and safe.

Tired of scrubbing with no results? Discover the top kitchen cleaning mistakes that could be holding you back and learn easy fixes to keep your kitchen spotless and safe.


Your kitchen is the heart of your home, but are your cleaning habits keeping it as clean and safe as you think? Even the most conscientious homeowners can unknowingly make cleaning mistakes that leave behind germs, cause damage, or just waste effort. In this guide, we’ll shine a light on common kitchen cleaning mistakes – from germy sponges to misused cleaners – and explain why they’re problems. More importantly, you’ll learn step-by-step how to clean the right way to fix each mistake and maintain a sparkling, hygienic kitchen. We’ll also cover how to properly clean up your kitchen after a renovation project, so your new space is truly move-in ready. Let’s get your kitchen cleaner, safer, and easier to maintain!
Mistake 1: Using Dirty or Old Cleaning Tools (Sponges, Cloths, Towels)
The Mistake: Reusing the same sponge, dishcloth, or kitchen towel for too long without properly cleaning or replacing it. It’s easy to grab that trusty sponge for every spill and wipe-down, day after day. Unfortunately, sponges and cleaning rags can become breeding grounds for bacteria. If you use a dirty sponge to “clean” countertops, you may actually be spreading germs around rather than removing them. The same goes for smelly dishcloths or never-washed towels – they can transfer odors and microbes to your “clean” dishes and surfaces. This mistake poses health risks (cross-contamination and foodborne illness) and defeats the purpose of cleaning. No one wants a hygiene hazard hiding in their cleaning tools.
Why It’s a Problem: A kitchen sponge is a notorious breeding ground for bacteria. Without proper care, a sponge or cloth stays damp and full of food particles – basically an all-you-can-eat buffet for germs. Using it on dishware or counters can contaminate those surfaces with whatever was on the sponge. According to cleaning experts, overusing your sponge means you’re essentially spreading bacteria around your kitchen. Dirty towels are no better; they can harbor pathogens and even mold. This can lead to unpleasant odors and health risks for your family. In short, unclean cleaning tools undermine all your other cleaning efforts by reintroducing dirt and bacteria.

What to Do Instead: Make a habit of keeping your cleaning tools clean and fresh. Here’s how:
- Disinfect and Dry Sponges Daily: After each day’s use, sanitize your sponge. You can soak it in a bleach solution, zap it (wet) in the microwave for 1 minute, or run it through the dishwasher on a hot cycle. This kills most germs. Then squeeze it out and let it dry in a ventilated spot (a constantly wet sponge breeds bacteria). Experts recommend disinfecting sponges daily.
- Replace Sponges Every 1-2 Weeks: No matter how diligent you are with cleaning, sponges have a short lifespan. Plan to throw out and replace your kitchen sponge about every two weeks (sooner if it starts to smell or fall apart). Keep a stash of new sponges handy. Replacing regularly ensures you’re always working with a relatively clean tool.
- Use Microfiber Cloths or Dish Brushes: Consider switching to microfiber cleaning cloths for wiping counters and rags – they’re machine-washable, so you can toss them in the laundry and use a fresh one each time. Likewise, a dish brush for scrubbing pots can be run through the dishwasher to sanitize. Microfiber cloths and brushes don’t harbor bacteria as much as sponges when cleaned properly.
- Launder Dish Towels Frequently: Don’t reuse the same dish towel for a week. Wash towels in hot water often (at least every few days, or daily if heavily used). Keep a rotation of clean towels and avoid using dirty ones to dry clean dishes. Skip fabric softener, which can trap residues; just a hot wash and thorough dry will do. By keeping towels clean, you prevent bacteria from spreading to your hands and dishware.
By using clean tools to clean, you’ll actually remove grime instead of moving it around. You’ll also keep nasty odors at bay. It may take a little extra effort to sanitize and swap out sponges and cloths, but the payoff is a genuinely cleaner, safer kitchen.
Mistake 2: Assuming the Sink Is Clean (When It’s Not)
The Mistake: Thinking that your kitchen sink “cleans itself” just because you run soapy water down it every day. Many people finish washing dishes and assume the sink and drain are clean too – after all, lots of soap and water just went through them. In reality, sinks accumulate grime and germs from food scraps and dirty dishes. If you’re not actively cleaning and disinfecting your sink, you’re making a mistake. You might notice a slimy film in the basin or a funky odor – signs that your sink needs attention. Ignoring the sink means you’re leaving one of the dirtiest spots in the kitchen unaddressed.
Why It’s a Problem: The kitchen sink is often one of the dirtiest places in the home, even more contaminated than the toilet. Think about everything that goes into your sink: raw meat juices, dairy residue, bits of produce, and soap scum. These residues foster bacteria and even mold, especially around the drain and disposal. If you only rinse the sink with water, you’re not removing the invisible film of germs. This can lead to bad odors, fruit flies, or even illness if bacteria like salmonella or E. coli linger where you wash dishes. In short, a dirty sink can re-contaminate anything you put in it, undermining your dishwashing hygiene.
What to Do Instead: Make sink cleaning part of your daily routine. Don’t worry – it only adds a couple of minutes but has big benefits for kitchen cleanliness. Follow these steps to keep your sink fresh and germ-free:
- Wash the Sink Daily: Once you’re done with the day’s dishes, give the sink basin a thorough scrub. Use a few drops of dish soap or a gentle cleaner and a non-scratch scrub sponge or brush. Scrub the entire sink basin, sides, and around the drain to remove grease and grime. Don’t forget the faucet and handles – grime accumulates there from frequent touching. Rinse everything with hot water. This daily wash prevents buildup of food film.
- Disinfect Once a Week: In addition to daily soap cleaning, sanitize your sink about once a week (or more often if you handle a lot of raw meat). After cleaning, fill the sink with a little hot water and a tablespoon or two of bleach, or use a kitchen disinfectant spray. Wipe down and let it sit for 5-10 minutes (check that the disinfectant is safe for your sink surface). Then rinse thoroughly. This kills lingering bacteria and ensures your sink isn’t a breeding ground. (For a natural alternative, you can use white vinegar to wipe down the sink – its acidity helps sanitize.)
- Scrub the Drain and Disposal: Food particles and gunk hide just out of sight. Scrub around the drain opening with an old toothbrush or a small brush. If you have a garbage disposal, periodically deodorize it: pour 1/2 cup of baking soda into the drain, then 1 cup of vinegar. Let it fizz and sit a few minutes, then flush with hot water. Grinding a few ice cubes and lemon peels in the disposal also helps scrape off residue and leaves a fresh scent.
- Wipe Dry: After each cleaning, rinse and wipe your sink dry with a clean cloth. A dry sink discourages bacterial growth (which thrives in moisture) and prevents water spots in stainless steel sinks.
By keeping your sink clean and sanitized, you eliminate a major source of kitchen bacteria and odors. You’ll notice your sink smells better and looks shiny. Plus, you can wash veggies or dishes in it without worry. Remember: a clean sink means the things you clean in it will stay clean, too!
Mistake 3: Using the Wrong Cleaning Products (or Mixing Them Unsafely)
The Mistake: Grabbing any old cleaner for every job – or worse, mixing cleaning chemicals together – without understanding if it’s appropriate. This mistake comes in many forms, for example: using a harsh abrasive cleaner on a delicate surface (like scrubbing a granite countertop with an oven cleaner), spraying bleach on everything, or combining bleach and ammonia because you think two cleaners are better than one. You might also be using a glass cleaner on stainless steel or dish soap on wood in ways that aren’t ideal. Using the wrong product can damage your kitchen surfaces and even create health hazards.
Why It’s a Problem: Cleaning products are formulated for specific purposes. Using the wrong one can cause lasting damage or pose safety risks. For instance, using an abrasive powder on a non-stick pan can scratch off the coating, ruining the pan. Spraying ammonia-based glass cleaner on finished wood cabinets could strip the finish. Bleach is effective at disinfecting but can produce dangerous fumes and ruin clothing if misused. The biggest no-no is mixing bleach with ammonia or acidic cleaners, which creates toxic chloramine gas that can be deadly if inhaled. Even less obvious combos (like vinegar + bleach or bleach + oven cleaner) can release hazardous fumes. At best, using the wrong product leaves streaks or residue; at worst, you could etch your stone countertops or harm your lungs. Bottom line: cleaning mistakes with chemicals can harm your kitchen and your health.

What to Do Instead: Use the right cleaner for the job, and keep it simple and safe. Here are the steps to avoid product pitfalls:
- Read Labels and Follow Instructions: Before using any cleaning product, read the label to check it’s suitable for the surface you’re cleaning. Most products specify where they can or can’t be used. Follow the usage directions (dilute if required, wear gloves if recommended, etc.). If the label warns “do not use on aluminum” or “ventilate area,” take it seriously. This prevents accidental damage.
- Use Gentle Cleaners on Delicate Surfaces: In the kitchen, it’s often best to start with the least abrasive cleaner that will do the job. For daily cleaning of countertops, cabinets, and appliance exteriors, a solution of mild dish soap and warm water is usually enough. Save harsher cleaners for tough grime. For example, use a soft sponge and gentle cleaner on non-stick pans (never steel wool), use pH-neutral or stone-specific cleaner on granite or marble (avoid acidic vinegar which can etch stone), and use glass cleaner only on glass. Test in a small spot first if you’re unsure.
- Never Mix Cleaning Chemicals: Mixing cleaners is a recipe for disaster. Do not mix bleach with ammonia, vinegar, or any other cleaner – this can create toxic gases that can make you seriously ill. Also avoid mixing different drain cleaners or oven cleaners together. If one product isn’t cutting it, rinse the area thoroughly and use another separately. It’s safer to use one product at a time.
- Ventilate and Protect Yourself: When using strong cleaners (like bleach-based sprays or oven cleaner), open windows or turn on the exhaust fan for ventilation. Wear rubber gloves to protect your skin, and possibly goggles if you’re scrubbing overhead. This will minimize inhaling fumes or getting chemicals on you. If a cleaner ever causes difficulty breathing or a burning sensation, step away and air out the room. Your safety comes first.
- Opt for Multi-Purpose or Natural Alternatives: To simplify, you can choose a good multi-purpose kitchen cleaner that is safe on most surfaces, so you’re not juggling five different bottles. Many homeowners use solutions like vinegar and water or baking soda paste as gentle, food-safe cleaners for surfaces like sinks, microwaves, and ovens. These DIY cleaners reduce the need for harsh chemicals (just remember vinegar and bleach don’t mix). By using a tried-and-true gentle cleaner, you avoid the risk of choosing the “wrong” product.
By being thoughtful about your cleaning products, you’ll avoid damage and keep your kitchen surfaces looking their best. Your granite will stay glossy, your non-stick pans will last, and you won’t be breathing in toxic fumes. When in doubt, remember: less is more – a bit of soap, water, and elbow grease often beats a cocktail of chemicals.
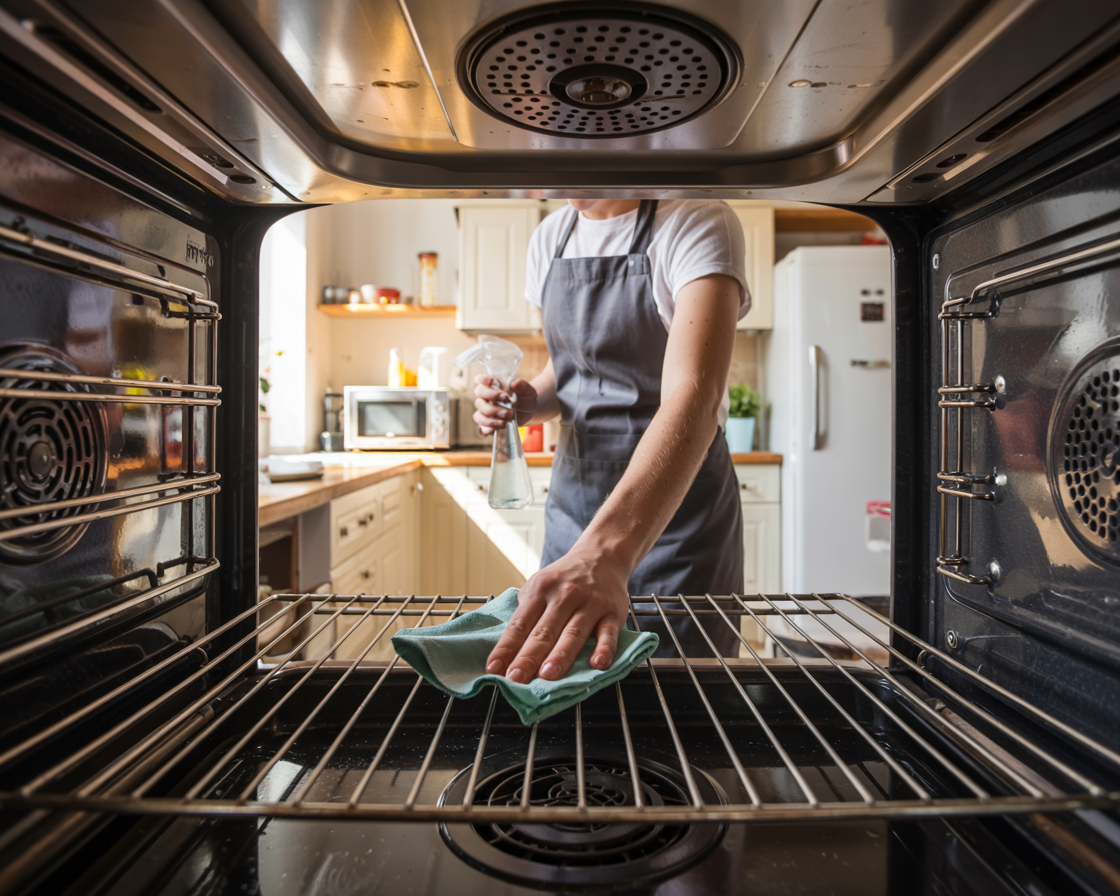
Mistake 4: Neglecting Kitchen Appliances (Dishwasher, Oven, Microwave, Fridge)
The Mistake: Out of sight, out of mind! We often forget to clean the appliances that do the cleaning or cooking for us. If you’ve never run a clean cycle on your dishwasher, scrubbed your oven, or wiped out your microwave and fridge in months, you’re making this mistake. Assuming “self-cleaning” appliances don’t need maintenance can lead to nasty surprises. Common examples: not cleaning the dishwasher filter, never degreasing the oven or range hood, letting the microwave build up splatters, or ignoring spills and expired food in the refrigerator. These appliances can get extremely dirty (or even less efficient) if not cleaned periodically.
Why It’s a Problem: Dirty appliances can harbor bacteria, create odors, and operate less efficiently. For instance, your dishwasher can accumulate food debris and soap scum, leading to funky smells and even dishes that don’t come out clean. An oven coated in burnt-on grease will smoke every time you use it (not to mention possibly affect flavor or even be a fire hazard). A microwave splattered with old food not only looks gross but can grow bacteria or mold, especially if food has spilled under the turntable. And consider your fridge: spills or forgotten leftovers in the back can turn into moldy messes that might contaminate fresh food. Plus, neglecting cleaning can shorten the lifespan of appliances – e.g., a clogged dishwasher filter can strain the motor. In short, ignoring your appliance interiors means your kitchen isn’t truly clean (what’s the point of a spotless counter if the microwave is a disaster?), and you could be inviting bad odors or even health risks.
What to Do Instead: Put your appliances on a cleaning schedule and tackle them one by one. You don’t have to clean everything at once – spread these tasks out. Here’s a simple guide for key appliances:
- Dishwasher – Monthly Clean: Clean your dishwasher about once a month to keep it running optimally. Remove the bottom rack and take out the filter (usually at the base) – scrub it with a brush under hot water to clear out gunk. Check spray arm holes for clogs. Then run an empty cycle with a cup of white vinegar on the top rack (use the hottest setting). This vinegar wash dissolves mineral deposits and washes away odors. Afterward, you can also sprinkle baking soda on the bottom and run a short hot cycle for freshness. A clean dishwasher means cleaner dishes and no musty smell.
- Oven – Monthly or As Needed: Ovens don’t need daily cleaning, but aim to deep clean your oven every few months or when you notice significant buildup (if you use it often, monthly is great; if rarely, you can do it quarterly). Use the oven’s self-clean cycle if it has one (following the manual’s instructions), or clean manually with a paste of baking soda and water. Spread the paste, let sit overnight, then wipe out – it works wonders on grime without harsh fumes. Wipe up spills as they happen (once the oven cools) to prevent baked-on mess. Regular cleaning prevents that smoky, burnt smell and keeps your oven efficient. Don’t forget to clean the oven racks (soak them in soapy water in the sink, then scrub).
- Microwave – Weekly Quick Wipe: The microwave is easy to clean often. Wipe it out weekly or anytime you see splatters. An easy method: fill a microwave-safe bowl with water and a sliced lemon (or a couple tablespoons of vinegar). Microwave on high for 3–5 minutes until it’s steamy, then carefully remove the bowl. The steam softens any gunk. Wipe the interior with a damp cloth or sponge – residue should come off with minimal scrubbing. Don’t forget the ceiling and door. This prevents buildup of dried food (and weird smells every time you nuke popcorn). A clean microwave also ensures no old food bits hitchhike into your next meal.
- Refrigerator – Deep Clean Every 3–4 Months: Every season, empty out your fridge and give it a thorough cleaning. Toss any expired or mystery items hiding in the back (take this chance to perform an “expiration sweep” of old condiments and leftovers). Remove the shelves and drawers if possible and wash them with warm soapy water. Wipe the interior walls with a mild cleaner or equal parts vinegar and water. Dry everything and put food back (wiping jars/bottles if they’re sticky). Doing this 3-4 times a year keeps your fridge sanitary and odor-free. Plus, you’ll be able to spot and discard expired foods regularly, which is important for food safety (and frees up space!).
- Small Appliances & Extras: Don’t forget other items: coffee makers (clean out old grounds and run a vinegar water cycle to descale), toaster ovens (empty crumbs and wipe grease), and range hood filters (these metal filters can be taken out and soaked/scrubbed to degrease). Even the garbage can counts as an “appliance” – give your trash bin a scrub and rinse outside once in a while to keep odors down. A quick word on garbage disposals: we addressed them in the sink section – regularly deodorize and flush to prevent clogs and smells.
By keeping up with appliance cleaning, you ensure every part of your kitchen stays clean and functions well. Set reminders if needed (for example, first weekend of the month = dishwasher and oven day, spring cleaning time = fridge day). You’ll prevent the gross buildup that makes cleaning intimidating. And your reward will be a kitchen that not only looks clean on the surface, but also is truly clean deep down, where it counts.
(For a handy reference, here are some suggested cleaning intervals: Dishwasher – monthly; Microwave – weekly light clean; Oven – every 1–3 months; Fridge – every 3 months; Coffee maker – monthly; Trash can – monthly; Range hood filter – monthly. You can adjust based on use.)
Mistake 5: Forgetting the Garbage Disposal and Trash Can
The Mistake: Taking out the trash bag but never cleaning the trash can itself, or ignoring your garbage disposal until it reeks or clogs. Many homeowners assume these “dirty” zones don’t need cleaning, but neglecting them is a mistake. If you’ve ever lifted your trash can lid and been hit with a foul odor, or your sink disposal starts smelling like last week’s leftovers, you know the issue. Forgetting to clean these waste areas leads to lingering odors and bacteria that can permeate your kitchen. Nobody wants their kitchen to stink, even if everything else is clean!
Why It’s a Problem: Trash cans and disposals are magnets for bacteria and bad smells. Bits of food inevitably escape the trash bag or cling to the can’s interior. Liquids might leak and pool at the bottom. Over time, this creates a nasty sludge that breeds bacteria and mold, causing foul odors. Those odors can attract pests like fruit flies or ants, and they certainly make your kitchen less pleasant. Similarly, a garbage disposal can accumulate rotting food scraps on its blades and in the drain pipes. If not cleaned, it can develop a pungent smell and even get clogged with gunk. In extreme cases, that bacteria-laden splash from a disposal can spread germs onto sink and counter surfaces. Essentially, a dirty trash can or disposal is a hidden hygiene hazard that can stink up your otherwise clean kitchen.

What to Do Instead: Include your trash can and garbage disposal in your cleaning routine – it doesn’t take long. Here’s what to do:
- Empty and Wash the Trash Can Regularly: Whenever you notice grime or odor (or as a rule of thumb, every month or two), deep clean your kitchen trash can. Take it outside if possible. Remove the bag and any loose debris. Rinse the can with a hose, then scrub the inside with a long-handled brush or sponge using hot water and dish soap (or a mild bleach solution for disinfection). Don’t forget the lid and rim where gunk splashes. Dump out the dirty water and rinse thoroughly. Let it dry completely (sunlight helps deodorize) before putting in a fresh bag. This washes away bacteria and eliminates smells. Tip: sprinkle a bit of baking soda in the bottom of the dry can to absorb odors between cleanings.
- Deodorize and Clean the Garbage Disposal Weekly: To keep your disposal fresh, try a quick weekly deodorizing routine. First, run very hot tap water down the drain for a minute to loosen debris. Then turn off water and toss a handful of ice cubes and a few lemon or orange peels into the disposal. Turn on the disposal and grind it up – the ice helps scrape off stuck-on bits from the blades, and the citrus peels deodorize with a fresh scent. You can also pour 1/2 cup baking soda into the disposal, then 1 cup white vinegar; let it fizz for 5-10 minutes, then flush with hot water (this combo eats away grime and kills odors naturally). Finally, to really clean, use a brush (or an old toothbrush) to scrub under the rubber splash guard/flange – lots of gunk hides there. By doing this regularly, your kitchen sink will never smell like a garbage can.
- Address Odors Immediately: If you catch a whiff of something funky near your sink or trash, don’t ignore it. Take a moment to sniff out the source. If it’s the disposal, do the cleaning steps above (you might need to fish out a trapped object carefully with tongs with the power off). If it’s the trash, remove the bag and clean the can sooner than planned. It’s much easier to clean at the first sign of odor than after it’s been fermenting longer. A quick action will save you from a tougher job later.
Keeping the “smelly parts” of your kitchen clean will hugely improve its overall freshness. You and your guests will not smell yesterday’s garbage or last month’s leftovers when you walk into the room. It takes just a few extra minutes, but it eliminates a major source of bacteria and bad odors. A clean kitchen isn’t truly clean if it stinks – so be sure to banish those smells at the source.
Mistake 6: Not Sanitizing Cutting Boards and Food Prep Surfaces
The Mistake: Simply rinsing your cutting board with water (or giving it a quick soapy wash) after preparing raw meat, and then using it for veggies or other foods without proper sanitizing. Or worse – using the same cutting board for raw chicken and then chopping salad on it later, assuming a wipe was enough. This mistake extends to any food prep surface that contacts raw foods, including knives and countertops. Failing to disinfect cutting boards and countertops after contact with raw meats, seafood, or eggs can spread dangerous bacteria. It’s an easy oversight when you’re busy cooking: you chop raw chicken, then immediately dice vegetables on that board – oops! That’s a classic cross-contamination mistake that could make someone sick.
Why It’s a Problem: Cutting boards (especially wood or plastic ones with knife grooves) can trap juices from raw meats, which often contain bacteria like E. coli, Salmonella, or Campylobacter. If not thoroughly cleaned, those microbes linger and can transfer to the next food you prep – say, raw veggies or cooked meat – leading to potential food poisoning. Simply rinsing with water or a cursory wash might not eliminate all bacteria. Experts warn that cutting boards can be a breeding ground for bacteria if used for both raw meat and vegetables without proper disinfection. The same goes for countertops where you might have placed raw meat packages or spilled juices. If you don’t sanitize after those contacts, you risk contaminating other foods or utensils placed there. In short, lack of sanitation on food prep surfaces is a serious health risk in your kitchen.
What to Do Instead: Adopt strict cleaning and sanitizing practices for cutting boards and any surface that touches raw ingredients. It’s easier than you think, and absolutely worth it to prevent illness. Do the following:
- Use Separate Boards (If Possible): Ideally, have at least two cutting boards – one dedicated to raw meat/poultry/seafood, and another for fruits, veggies, breads, and cooked foods. This way you greatly reduce the chance of cross-contamination. Many home cooks use color-coded boards (e.g., red for meat, green for produce). If you only have one board, wash and sanitize it thoroughly between different foods as described below – do not cut salad fixings on it right after prepping raw chicken without cleaning it.
- Wash with Hot Soapy Water: After each use (especially after raw meat), scrub the cutting board well with hot water and dish soap. Don’t just rinse – use a scrub brush or sponge to get into any knife cuts. This physical cleaning removes food particles and lots of germs. For wood boards, do this quickly and don’t soak too long (to avoid warping), but still clean it well. Wash any knives, utensils, and countertops that had contact in the same manner.
- Sanitize the Board: Washing might not kill all bacteria, so sanitizing is the crucial second step. You have a couple of options: Bleach solution – mix about 1 teaspoon of bleach in 1 quart (4 cups) of water, then flood the board with this solution or submerge the board in it. Let it sit for a few minutes, then rinse with clean water and air dry. Vinegar or Hydrogen Peroxide – if you prefer not to use bleach, you can wipe the board with white vinegar, or a 3% hydrogen peroxide solution, let sit, then rinse. Commercial disinfectant spray – ensure it’s food-safe. Whichever method, do it after the initial wash. Experts recommend disinfecting cutting boards after each use, not just rinsing, to kill lingering bacteria.
- Air Dry Completely: After sanitizing, prop the cutting board up to air dry thoroughly. Drying helps kill remaining microbes (bacteria love moisture). Make sure it’s fully dry before storing. This also prevents mold or mildew on the board.
- Additional Tips: For plastic boards, you can also run them through the dishwasher (the high heat sanitizes them). For wood boards, occasionally sprinkle coarse salt and rub with half a lemon to deodorize and sanitize naturally. Also, replace deeply grooved or very old cutting boards – if they’re too scored, they’re harder to completely clean.
By treating your cutting boards and prep surfaces with the same care you would your dishes (or even more), you’ll eliminate harmful bacteria and keep your food safe. This is one of those habits that’s easy to incorporate: a quick sanitizing step can prevent a serious case of food poisoning. Keep in mind the golden rule of kitchen safety – “Always sanitize surfaces that have touched raw meat before they touch anything else.” Your family’s stomachs will thank you!
Mistake 7: Rushing Through Cleaning (Not Letting Cleaners Work or Skipping Prep)
The Mistake: We’re all busy, and it’s tempting to clean everything as quickly as possible – spray, wipe, done! But speed-cleaning can backfire if you don’t allow cleaners time to work or you skip simple prep steps that make cleaning easier. Common examples: spraying a surface and immediately wiping it off (then wondering why streaks or germs remain), or not pre-soaking a crusty pan and instead scrubbing furiously and scratching it. If you find yourself scrubbing extra hard or using lots of elbow grease, it might be because you didn’t give the cleaner time or you rushed the process. Skipping steps like pre-soaking baked-on food, or not letting disinfectant sit on a sticky spill, are mistakes that make cleaning less effective and more labor-intensive.
Why It’s a Problem: Most cleaning solutions – whether it’s a countertop spray or dish soap on a greasy pan – need a few minutes of “dwell time” to break down grime and kill germs. If you spray and wipe immediately, you’re likely leaving behind bacteria (the surface might look clean but isn’t truly sanitized). For disinfectants in particular, the product often needs to remain wet on the surface for several minutes to do its job. By wiping too fast, you basically undo its germ-killing power. Likewise, skipping pre-soak on stubborn food means you’ll work much harder to scrape it off, potentially scratching cookware or just wasting time. Experts note that letting dishes soak for a bit in warm water makes the actual washing much easier and faster. Rushing can also mean you take shortcuts like not moving items on the counter (cleaning around things, leaving grime underneath) or mopping before you’ve swept (leading to a grimy mop). In essence, rushing = not really cleaning, or making the task tougher than it needs to be.
What to Do Instead: Slow down just a bit and use strategy over sweat. A few extra minutes of wait time or prep can save you scrubbing and ensure a truly clean result. Here’s how to clean smarter, not harder:
- Let Cleaners Sit: When you spray a cleaner (be it on the counter, stovetop, or in the shower for that matter), wait a few minutes before wiping. For general surface cleaners, even 2-3 minutes can help loosen dirt. For disinfectants, check the label – many require 5-10 minutes of contact to kill bacteria. Use that time to clean something else nearby. For example, spray your countertop and while it sits, clean the stovetop; then go back and wipe the counter. You’ll find grime comes off easier and you’ve truly sanitized the surface by being patient. (Just don’t let it dry completely; if it starts drying, it’s time to wipe.)
- Pre-Soak Dirty Dishes and Pans: Instead of attacking a pan caked with burnt food or a casserole dish with baked-on residue immediately, fill it with hot water and a squirt of dish soap and let it soak for 10-15 minutes (or longer, even overnight if it’s bad). This soaking softens and loosens the gunk dramatically. When you come back, that burnt food will lift off with a gentle scrub, sparing your cookware from heavy scraping. This also applies to your oven – if something spilled and baked on, put a bowl of water inside and heat at low temp to create steam, then let it cool; the steam will have loosened the grime for easier wiping. A little wait time can turn a dreaded scrubbing chore into a quick wipe-down.
- Use “Dwell Time” for Multitasking: The great thing about letting things soak or sit is you can do another small task meanwhile. For instance, while your sink is soaking with a cleaner, you could run the vacuum over the kitchen mat. Or while the microwave steam-bath is working (as described above), you can wipe the exterior of the microwave or fridge door. This way, you’re still efficient with time, but not actively scrubbing the whole time. Cleaning smarter means the chemicals or hot water do a chunk of the work for you.
- Follow the Proper Order: Rushing often leads to doing things out of order (and then having to re-do them). Remember to clean from top to bottom in a room: in the kitchen, that means wipe counters before you mop the floor, and wipe the stove before you clean the counters (crumbs from stove will fall). Otherwise you’ll drop crumbs on a freshly mopped floor – frustrating! Take a moment to plan the order: typically, do dusting or high surfaces first, counters and stovetops next, and floors very last. This way you’re not re-cleaning any area. It doesn’t take longer, it actually saves time overall.
- Don’t Skip Small Prep Steps: Little habits like taking everything off the counter before wiping it (instead of just wiping around things) or emptying the crumb tray in your toaster regularly can make a big difference. It might seem faster to wipe around the knife block and canisters, but crumbs and grease collect around those items. Taking the extra 30 seconds to move them and do a thorough wipe prevents buildup that would take much longer to tackle later. Similarly, run a dustbin or vacuum before mopping so you’re not wet-mopping around bits of dry debris. These small steps ensure you’re actually cleaning effectively the first time.
By cleaning with a bit more thought and a bit less rush, you’ll ironically save yourself effort and time in the long run. Your kitchen will be truly clean – no hidden grime or half-killed germs – and you won’t find yourself going “ugh, why is this still dirty?” or redoing tasks. As one cleaning pro advises: “Be patient and let the cleaner do most of the work for you”. Your job then becomes easier, and the results will shine (literally!).
How to Properly Clean a Kitchen After a Renovation Project
Renovations can transform your kitchen’s look and functionality, but they also leave behind an unavoidable mess. Fine dust, construction debris, and stray paint splatters tend to coat every surface, even in the tidiest remodel. Cleaning a post-renovation kitchen is a bigger job than ordinary housekeeping – but it’s a crucial final step to truly enjoy your new space. In fact, the time and effort required for a deep clean is often one of the hidden costs of renovations that homeowners don’t anticipate. Don’t worry: with a systematic approach, you can tackle the post-renovation cleanup efficiently. Here’s a step-by-step guide to get your kitchen immaculate after the contractors are done:
1. Start with Safety and Air: Before you dive into cleaning, ensure the area is well-ventilated. Open windows and doors to air out dust and any lingering paint or adhesive fumes. If the renovation kicked up heavy dust (from drywall sanding, for example), consider wearing a dust mask while cleaning to avoid inhalation. Also, gather your cleaning supplies: garbage bags, a good vacuum (ideally with a HEPA filter for fine dust), microfiber cloths, a bucket, mild cleaning solution, and mop. Having everything ready will streamline the process.
2. Remove All Debris: Go through the kitchen and pick up any large debris or trash left from construction. This includes wood scraps, plastic coverings, tape pieces, protective floor paper, etc. Check inside cabinets and drawers for any stray screws or materials. Throw out what you don’t need or set aside leftover tiles/paint for storage. Clearing the clutter lets you focus on the dust and dirt. Don’t forget to peel off any protective plastic film from new appliances or fixtures at this stage.
3. Vacuum Everywhere (High to Low): Renovation dust is ultra-fine and gets everywhere. Use a vacuum with a brush attachment to vacuum all surfaces systematically. Start high – ceilings, crown molding, top corners of walls – and work your way down. Vacuum walls (yes, drywall dust can coat the walls), the tops of cabinets, light fixtures, window sills, and countertops. Open all cabinets/drawers and vacuum inside those too. Finish by vacuuming the floor thoroughly. Take your time, as this step will remove the bulk of the dust without just redistributing it into the air. A HEPA-filter vacuum is ideal because it traps fine particles. If you only have a regular vacuum, be prepared to change/clean filters frequently during this process. By vacuuming first, you prevent scratching surfaces (by removing grit) when you later wipe them.
4. Wipe Surfaces with Damp Cloths: After vacuuming, there will still be a film of dust. Wipe down every hard surface with a damp microfiber cloth. Again, work top to bottom and tackle one area at a time. For example, wipe the top of the fridge, then the counters, then cabinet doors, then baseboards. Rinse or switch to a fresh cloth frequently – you’ll see it get gray with dust quickly. Use a mild all-purpose cleaner or just water with a bit of dish soap. Avoid soaking things; a light damp wipe is better to capture dust without damaging new paint or wood. Don’t forget less obvious areas: the sides of cabinets, interior shelves, inside and outside of new appliances, faucet fixtures, etc. It may take a couple of passes until your cloth comes away clean. Pay special attention to corners and crevices where construction dust collects. This wipe-down will reveal the true sparkle of your new finishes.
5. Clean Inside Cabinets and Drawers: If your cabinets were installed or sanded as part of the reno, they likely have sawdust inside. Even if not, dust floats in. Take out any shelf liners or items, and wipe inside thoroughly with a damp cloth. Vacuuming might not catch all the fine dust in corners, so a wipe is important. This ensures that when you put away your dishes and pantry goods, they won’t get dusty. If you have new drawers, pull them out and clean underneath/behind them as well (often sawdust piles there). This step is a bit tedious but you’ll only need to do it once after the renovation, and it makes a big difference in long-term cleanliness.
6. Tackle the Details: Now for the detail work: clean all new appliances and fixtures to remove fingerprints, installation residues, or labels. For stainless steel appliances, use a soft cloth and mild cleaner to avoid scratching the new finish. Wipe down the inside of the oven, microwave, and fridge (construction dust could have settled inside if they were in place during the work). Clean glass surfaces like windows, glass cabinet inserts, or light fixtures with glass cleaner for a streak-free finish (do this after dusting or you’ll get muddy streaks). Check for and gently remove any paint splatters or adhesive residue on countertops, floors, or backsplashes – a plastic scraper or your fingernail can usually pop those off, or use a specialized remover if needed (careful on delicate surfaces). Also, replace the HVAC air filter in your home after a major dusty renovation; your vents likely pulled in a lot of dust, and a fresh filter helps your whole house.
7. Finish with the Floors: The last step is to deep clean the kitchen floor. By now, much of the dust has fallen to the floor and been partially vacuumed. Depending on your flooring type, do a thorough mopping or scrubbing. For tile, stone, or vinyl floors, a neutral cleaner and warm water works well – change the water often so you’re not just swishing dust around. For hardwood floors, use a wood-safe cleaner (avoid excessive water) and a microfiber mop. You might need to go over the floor twice – the first pass may leave a haze that a second pass will pick up. Get into the corners and under toe-kicks. Once done, your floor should be free of the gritty feeling of drywall dust. Finally, vacuum any dust that might have been knocked down onto the floor edges one last time.
After these steps, your post-renovation kitchen should be spotlessly clean and ready for use. Run your hand over a countertop or along a shelf – it should come up clean, without that powdery film. Take a deep breath – no drywall or sawdust smell, just that “new kitchen” scent! Now you can move your belongings back in and start cooking in your beautiful, renovated space.
A proper post-reno cleaning protects your investment – you can now see and appreciate all the fine details and finishes you chose. (Plus, you avoid inhaling leftover construction dust or having it irritate your lungs.) If a renovation is in your future, remember to factor in time for this clean-up phase; some homeowners even choose to hire a professional post-construction cleaning crew, which can be an added expense. But with the steps above, you can certainly handle it DIY. Enjoy your like-new, truly clean kitchen!
Tip: To keep that fresh kitchen feeling, maintain a regular cleaning routine moving forward. It’ll be easier now that you’ve reset everything to baseline clean.
Final Thoughts
Maintaining a clean kitchen isn’t just about appearances – it’s about keeping your home healthy, safe, and enjoyable. By avoiding these common cleaning mistakes, you’ll save yourself time and trouble in the long run. No more wondering why the kitchen still smells, or why your “clean” dishes have residue. You now know how to tackle the sneaky spots (hello, germy sponge and stinky trash can) and clean like a pro. Remember, small habits like replacing sponges often, wiping up spills promptly, and letting cleaners do their magic can make a HUGE difference in how clean your kitchen truly is.
Your kitchen will thank you with sparkling countertops, fresh smells, and appliances that run smoothly. And when it comes to big projects like renovations, you’re prepared to handle the cleanup so your dream kitchen shines from day one. Here’s to a spotless, stress-free kitchen and the confidence that you’re cleaning the right way!
Ready to take on more home improvements now that your kitchen is in tip-top shape? Keep in mind that a clean, functional kitchen is just one aspect of a happy home. If you’re planning any renovations or upgrades, doing it the smart way is key. With Bidmii, you can make those projects just as hassle-free as your new cleaning routine. Bidmii is an easy, secure platform for managing home improvement projects – you can find trusted contractors, schedule jobs, and handle payments all in one place with 100% payment protection and vetted pros. Why stress about coordinating renovations or worry about contractor reliability? Let Bidmii simplify the process so you can focus on enjoying your beautifully maintained home. Whether it’s a kitchen remodel or a whole-home makeover, Bidmii helps you get it done with peace of mind. Check out Bidmii today to discover a better way to make your dream projects happen, and keep your home shining every step of the way.


